
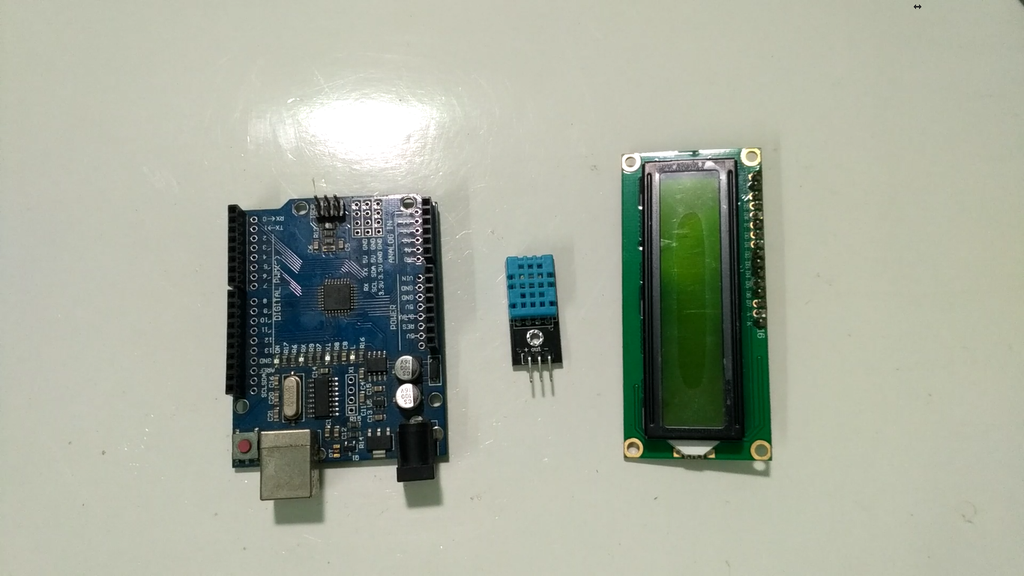
Step 2: About DHT11 Sensor
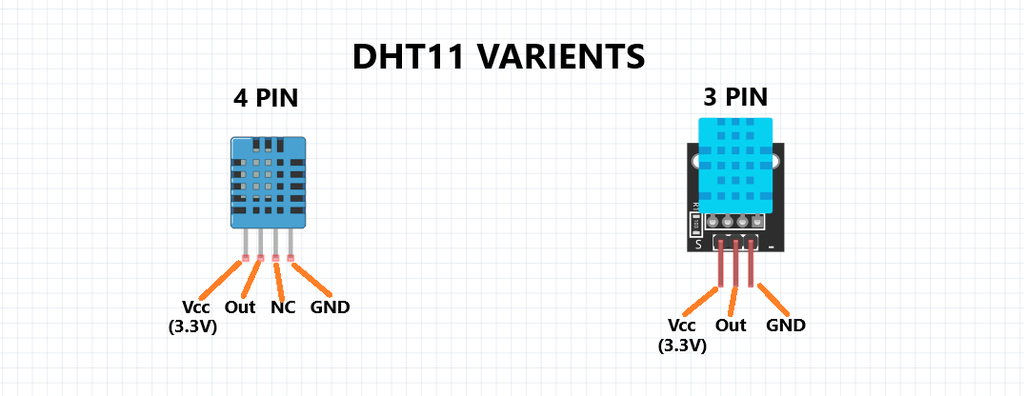
DHT11 is a humidity and temperature sensor. It can be used as humidity sensor as well as the temperature sensor. You can find the dht11 sensor of 2 types in the market. One is with 4 pins and another is with 3 pins. In 3 pin dht11 sensor already 10k Ohm resistor is added inside the module. The operating voltage of this module is 3.3 V. The output of this sensor is digital.
Step 3: Connecting DHT11 With Arduino
If you are using 4 pins DHT11 Connection are as follows
DHT11 Arduino UNO Vcc 3.3V Out PIN4 (Digital) GND GND NC --Connect a 10K Ohm resistor between Vcc and Out Pin of DHT11.
If you are using 3 pins DHT11 Connection are as follows
DHT11 Arduino UNO Vcc 3.3V Out PIN4 (Digital) GND GND


If you are using 4 pins DHT11 Connection are as follows
DHT11 Arduino UNO Vcc 3.3V Out PIN4 (Digital) GND GND NC --Connect a 10K Ohm resistor between Vcc and Out Pin of DHT11.
If you are using 3 pins DHT11 Connection are as follows
DHT11 Arduino UNO Vcc 3.3V Out PIN4 (Digital) GND GNDStep 4: Connecting I2C LCD Display to Arduino
I already made an instructable on how to connect I2C LCD display to Arduino
You can check here https://www.instructables.com/id/How-to-Connect-I2...
I2C LCD Arduino
GND <---> GND
VCC <---> 5V
SDA <---> A4
SCL <---> A5


I already made an instructable on how to connect I2C LCD display to Arduino
You can check here https://www.instructables.com/id/How-to-Connect-I2...
I2C LCD Arduino
GND <---> GND
VCC <---> 5V
SDA <---> A4
SCL <---> A5
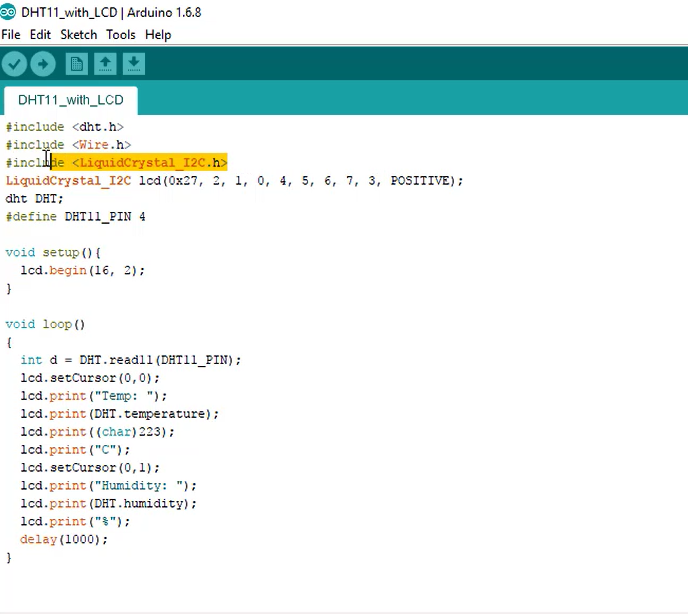
Step 5: Code
You must include dht11 and I2C LCD libraries. You can download below.
#include <dht.h>
#include <Wire.h>
#include <LiquidCrystal_I2C.h>
LiquidCrystal_I2C lcd(0x27, 2, 1, 0, 4, 5, 6, 7, 3, POSITIVE);
dht DHT; #define DHT11_PIN 4
void setup(){
lcd.begin(16, 2); }
void loop() {
int d = DHT.read11(DHT11_PIN);
lcd.setCursor(0,0);
lcd.print("Temp: ");
lcd.print(DHT.temperature);
lcd.print((char)223);
lcd.print("C");
lcd.setCursor(0,1);
lcd.print("Humidity: ");
lcd.print(DHT.humidity);
lcd.print("%");
delay(1000);
}
Comments
Post a Comment