Bill Of Materials
Coding
Assuming that you have your RPi ready with Raspbian OS and Python IDE and have access to the RPI desktop either by VNC or by HDMI based display. So we are going to start with the installation of modules and library for our project. First, open the linux terminal on your Raspberry Pi. Then install the required using the following syntax .
NOTE:- We are using Python3 Environment and code is compatible with python 3 and above version only.
sudo apt-get update
sudo apt-get upgrade
sudo nano /etc/dphys-swapfile
Then change the line CONF_SWAPSIZE=100 to CONF_SWAPSIZE=1024
sudo /etc/init.d/dphys-swapfile stop
sudo /etc/init.d/dphys-swapfile start
sudo pip3 install opencv
sudo pip3 install numpy
wget https://bootstrap.pypa.io/get-pip.py
pip3 install dlib
pip3 install tensorflow
After the installation you can now proceed with the cloning of TF modules, examples, and files using the following command:
git clone https://github.com/tensorflow/tensorflow.git
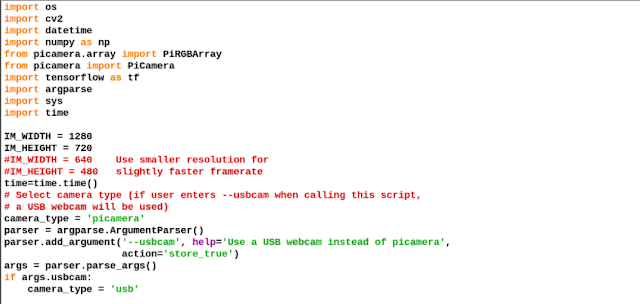
After successfully cloning, go to the directory → research folder → detect.py file in python IDE. Now let’s understand and change the code. (Refer fig 1.)
The first part of the code consists of the required library and modules. Next, we have to set the path level text file that consists of the category names of species/objects we want to make it detect. Here we have set the category level file as New.pbtx. The next part of the code is for object/species detection and then we have the code that stores the output of detection result in a string variable called “name”. Then we have the code that allots the image name with detection date and time.
Next, we have a conditional statement that checks the output result of detection and if the condition of the result of detection is not “[]” then it saves the result with date and time in a text file with detection date and time. The next part of the code saves the detected image in the database folder. Here you can change the path for image storage as per your choice. (Refer the Fig 2,3,4).
Fig 2.
Fig 3.
Fig 4.
Now save the code. Next, go to the data folder and create a file named New.pbtxt file and the category of animal/species name for detection and then save that. ( Refer Fig 5,6).
Fig 5
Testing
After finishing all the above parts, connect the camera module in Raspberry Pi camera port using a ribbon cable (Refer Fig 7). Next, open the code in Python IDLE and run the script and wait for few minutes so that it can load all the tensor flow modules. This will open a new window with the camera video output. Bring the camera in front of any animal such as a cow, sheep etc. Whenever an animal appears in the camera frame it will get detected and the results will be saved in a text file, and it will save that frame image in the database folder with date and timestamp. (Refer Fig 8).
Python-Based Species Classification Wireless Camera For Forest Survey And Monitoring Prototype
Now to check the detected species/animals for survey open the db data.txt to see the list of species/animal detected with time and date. Next, if you want to get the picture of those detected species/animal for study then open the database folder and you can see all the pictures with date and time of detected species. (Refer Fig 9,10).
Fig 9.
Download Source Code
This Post is a Requested post for one of our reader.


Comments
Post a Comment