
When I think about a VPN service, the first thing that comes to my mind is all subscription-based plans. Also, there are numerous ads that YouTube or other OTT platforms always pours on us. However, those services are not the only way through which you can encrypt your online activity.
One-click VPN services are excellent if you are looking for an out of the box solution, but that service comes with a cost and putting the trust of your valuable data to these servers is not safe. So as a cheaper, and safer dilemma, I like to use the popular Raspberry PI zero with PIVPN to make my VPN server and in this tutorial, I will tell you how you can set up your OpenVPN server on a Raspberry PI very simply.
Raspberry pi is a pocket-sized computer and suitable for creating many types of web-based servers like:
- Raspberry Pi Print Server
- Plex Media Server on Raspberry Pi
- Raspberry Pi Minecraft Server
- Raspberry Pi NAS Server using Samba
- Raspberry Pi using Mopidy Music Server
What is a VPN?

1. Your locations stay private.
2. Your data is encrypted.
3. You can surf the web anonymously.
I decided to set up a VPN server on my home network using a Raspberry Pi. This way I can securely connect to my local network while I am not home. Also, I just don't want to leave an SSH port open for just anybody to hack in.
Why use a VPN?
Types of VPN
Point–to–Point Tunneling Protocol (PPTP):
L2TP/IPSec:
OpenVPN:
SSTP:
IKEv2:
What You'll Need for Raspberry Pi OpenVPN Server

To set this up, you'll need the obvious:
- A Raspberry Pi (I am using a Raspberry PI Zero).
- A Wi-Fi adapter or a USB to Ethernet Adapter (I am going to use the Wi-Fi adapter).
- A USB OTG cable.
- A Power Brick can deliver sufficient current.
- A micro SD card.
- USB cable to power it.
Setting up the Raspberry pi for VPN Server
Setting up your raspberry pi is very easy and requires very few steps. To set up a raspberry, you need to download the Raspberry Pi OS from the official Raspberry PI website and prepare the SD card and install Raspberry PI OS on it. Learn more about getting started with Raspberry pi here.
Download the Raspberry PI OS:

I am using a Raspberry pi zero, so I am going to download the Raspberry Pi OS (32-bit) Lite image.
Flash the SD Card:
To flash that, we need a tool called balenaEtcher or you can use your favourite flashing tool.

I recommend the portable version since it is not something that we need to install. Open Etcher > Choose Your File > Choose Your Target and just Flash it! And your Done.
Once the Flashing process is finished, you will get a small 250MB partition named boot.
Setup Headless SSH:
To set up the Headless SSH, you need to create an empty file named ssh. This simple step will enable ssh for the Raspberry Pi.

Setup Headless Wi-Fi:

To set up Headless Wi-Fi, you need to make a file, named wpa_supplicant.conf and save it into the boot partition, which I have previously mentioned.
The content inside the file listed below:
ctrl_interface=DIR=/var/run/wpa_supplicant GROUP=netdev
update_config=1
country=<Insert 2 letter ISO 3166-1 country code here>
network={
 ssid="Test_Raspberry-PI"
 psk="12345678"
}
You need to put the SSID and password of your router in the SSID and PSK section.
And That's it for the SD card part, now you need to put the SD card onto your Raspberry Pi and power it up.
Assign a Static IP:

It's really important to assign a static IP address for the raspberry PI, otherwise, it will change dynamically and cause us problems.
In my router, I have an operations tab, by clicking it in the green sign, I can reserve the IP address for the Raspberry Pi. If you are doing this, you need to find the process for your router.
SSH to the Raspberry PI:
Now it's time to SSH to the raspberry pi and update and upgrade the operating system, to do that, I am going to use the Git Bash from my windows PC. You can use PuTTY if that is your favourite SSH app.

You need to SSH to your raspberry pi by typing PI@your IP Address, in my case, it was pi@192.168.1.2 and if everything works fine, you will be prompted to enter your password.

Enter the default password for the Raspberry Pi which is raspberry.

And everything works fine, then you will be prompted with pi@raspberry bash. Congratulations you have successfully SSH into your raspberry pi.
Now, you need to update and upgrade your Raspberry PI OS, to do that type in the following command and hit enter.
sudo apt-get update && sudo apt-get upgrade
Change the default SSH Password:
After update and upgrade, it is very important to change the default SSH password for the Raspberry Pi else hackers can very easily SSH into your network and break the password.
To do that you need to type in sudo raspi-config and you will be presented with the following screen.

Hit enter because it's the first option in the list, enter your new password and you are good to go.
Now we will set up OpenVPN by utilizing the PIVPN project on the PIVPN website.
Installing OpenVPN with PiVPN in Raspberry Pi Zero
Because of the PIVPN, installing a VPN on Raspberry Pi is incredibly easy, follow the steps below and you will have a VPN server in no time.
First, Go to the PIVPN website and copy the given curl command.

Next, SSH into your Raspberry PI and paste in your code and hit enter, this will download & set up all the necessary setup to run OpenVPN.
After that, you will be greeted with the below screen saying it will convert your raspberry pi into OpenVPN.

In the next screen, it's asking you to set up a static IP address for your Raspberry Pi, we already did that previously so we do not need to do it again. Select Yes and move on.

Next, we need to specify a Local User for the server.
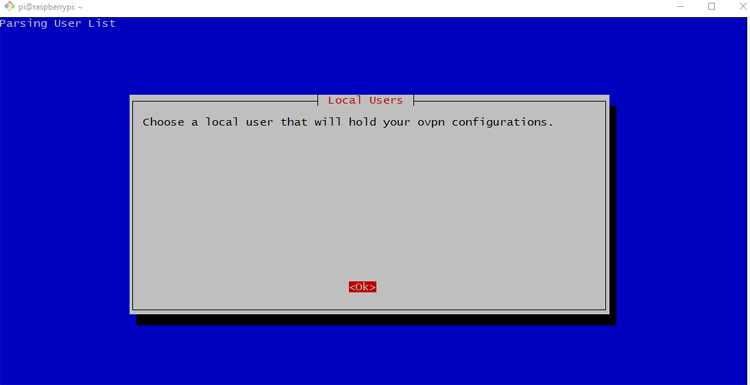
Hit enter and you will be presented with the user selection page, choose pi (Which is the default User), and hit enter.

Next, you need to choose what type of VPN you like to use. It's the open VPN:

Choose OpenVPN and hit Enter.
Next, it will prompt you to choose a protocol, options are TCP and UDP.
I am using UDP because it is faster than TCP.

Next, you need to select the UDP port.

Confirm the settings by selecting yes and hitting enter.
Next, you are prompted to select a DNS provider. I am selecting Google as my DNS provider.

Next, you will be prompted to select your search domain.

Select yes and hit enter.
After selecting yes, you have to make a dynamic DNS server, this is because we want to access our VPN network outside our home network.
To do so, you need a free dynamic DNS name server, for that, I am going to use dynu. It's free and easy to set up.
Make a free account and you are good to go. Moving on...
Next, you have to enter your dynamic DNS server name and hit enter, if everything is alright, you will receive your public IP address in the raspberry pi console.

I am going to use Open VPN 2.4 or later if you are using something else choose NO.
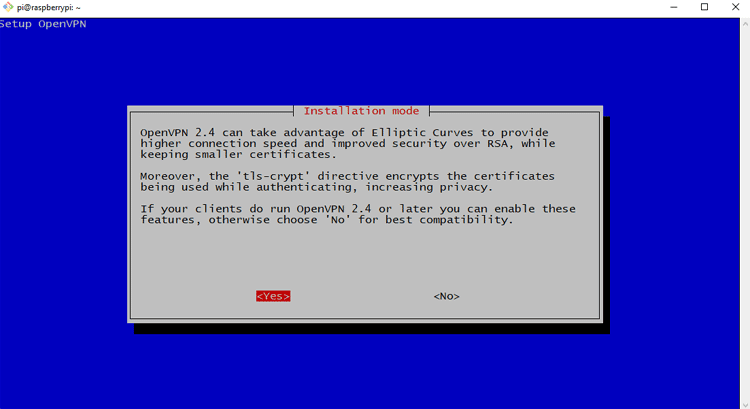
Next, choose what type of encryption we want. I am going to choose a 256-bit certificate.

Next, it's telling us to enable automatic updates for bug fixes and security updates.

I am going to choose yes here.

Now, it will run the code and install everything necessary.

Finally, you need to reboot your pi and finish the setup process.

Now we have to log back into the raspberry pi and run pivpn add

After, the Raspberry Pi reboots log back into the Pi using SSH and run the command pivpn add.
This will create a new VPN profile, we need to create a VPN profile for every device we need to connect to.
When you enter pivpn add into your terminal and hit enter, you will be prompted with some options, which is shown below.

Now, the file is made and we need to copy it to our desktop so that I am going to use the secure copy method. Run the following command to do so.
scp pi@192.168.1.2:/home/pi/ovpns/test.ovpn /c/Users/your directory/Desktop

When that's done, we need a VPN client for PC, for that, I am going to use the OpenVPN Client software in the OpenVPN community-download page.
Now, when the download and installation process is finished, run it, if you get an error, don't worry, it's just that the software did not find any profile, click ok and you will get a new icon in the system tray of your PC.

Which looks like the above image, right-click and click import > provide the .ovpn file and click ok. You will get a message 'the import was successful'.
Now all you need to do is wait for a little bit and give the GUI a little time to do its things. After a few moments, you will see a green icon and the VPN should get connected.

And, voila! After typing the password, you should be connected to your very own OpenVPN server on Raspberry Pi.
Start browsing with privacy!
Connect to Your VPN From Anywhere.
Comments
Post a Comment