Arduino Uno, the most popular microcontroller among electronics hobbyists and students and its pretty easy to get started with embedded systems using Arduino But one drawback of Arduino is that it needs to be connected to the computer using USB cable to upload the code as it has done have any onboard support for wireless communication.
And sometimes, it is very difficult to connect the board with PC if your project is fixed somewhere. The only solution to this problem is by programming the Arduino wirelessly. Wireless programming or OTA (Over the Air) Programming can be done easily in ESP8266 and ESP32 as they have Wi-Fi support inbuilt on board. But in Arduino, we have to use the Bluetooth module to program it wirelessly. So here we are going to learn how to program Arduino over Bluetooth.Components Required
Arduino UNO
HC05 Bluetooth Module
Jumpers Wires
1K, 2.2K Resistors
Capacitor (0.1uF)
Power Adapter
Breadboard
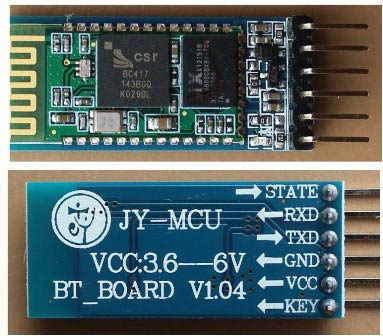
HC05 Bluetooth Module
HC‐05 module is a Bluetooth Serial Port Protocol module, specially designed for wireless communication between microcontrollers. HC-05 Bluetooth module provides switching mode between master and slave mode configuration and communicates through Serial Communication at 9600 baud rate, which makes it easy to interface with controller. HC05 module works on 3.3 V but we can connect it to 5V supply voltage because the module comes with onboard 5v to 3.3 V regulator.
Program Arduino over Bluetooth
To wirelessly program Arduino, first, we have to program the Arduino to respond to AT commands. For that, connect the Arduino to Laptop’s serial port and upload the below code:
#include <SoftwareSerial.h>
SoftwareSerial HC05(2,3);
void setup()
{
Serial.begin(9600);
Serial.println("Enter AT commands:");
HC05.begin(38400);
}
void loop()
{
  if (HC05.available())
    Serial.write(HC05.read());
  if (Serial.available())
    HC05.write(Serial.read());
}
The first two lines of the code are used to include the SoftwareSerial library and to define the transmitter and receiver pins where the Bluetooth is connected. SoftwareSerial library is used to allow serial communication with a digital pin other than the Hardware Tx and Rx pins of Arduino. Multiple software serial ports can be used for Serial communication using the SoftwareSerial library.
#include <SoftwareSerial.h>
SoftwareSerial HC05(2,3);
Now inside the setup function, define the baud rates for both Hardware and Software serial ports. The Baud rates for Hardware and Software serial ports are 9600 and 38400 respectively.
void setup()
{
Serial.begin(9600);
Serial.println("Enter AT commands:");
HC05.begin(38400);
}
There are two if conditions used inside the loop function. First condition checks if any command is given to HC05, if yes, then write it to Arduino Serial Monitor. The second condition checks if any command is given to Arduino Serial Monitor, if yes, then send it to HC05.
void loop()
{
if (HC05.available())
Serial.write(HC05.read());
if (Serial.available())
HC05.write(Serial.read());
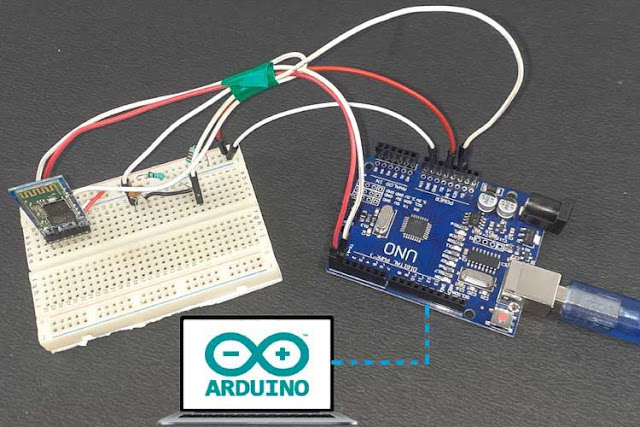
}Next, connect the Arduino at the HC05 to put it into AT Command mode. The Circuit Diagram for the same is given below:

Before connecting the Arduino to the computer, press the key button, and then connect the Arduino to a computer. Hold the key button until the Bluetooth module LED starts blinking at an interval of 2 seconds. The Bluetooth module LED blinks slower in command mode than the normal mode.
Now open up a serial monitor and enter the following commands, in return, the board will respond with an "OK" each time command runs successfully.
AT+ORGL
AT+ROLE=0
AT+POLAR=1,0
AT+UART=115200, 0, 0
AT+INIT
After successfully testing the AT commands, just remove all the connections and connect it as per the schematics below.

Use the Adapter or a 9V battery to power the Arduino. After this, go to the ‘Devices’ in your Laptop, turn on the Bluetooth, and then connect the Bluetooth module to your Laptop.
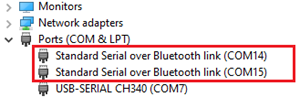
After the device has been successfully paired, the next task is to find the COM port for the HC05 Bluetooth module. To do so, go to the ‘Device Manager’, and check the COM Ports option. It will display two COM ports, one for incoming and the other for outgoing. We need to select the second COM port number as we are uploading the program.
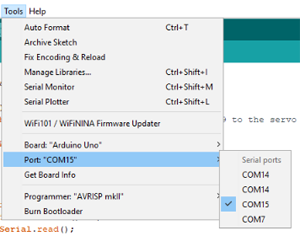
Now open up the Arduino IDE and select the blink program, select the right com port, and hit the upload button. If everything went well, the Arduino onboard LED will start blinking at an interval of 1 sec.
1 2 3 4 5 6 7 8 9 10 11 12 13 14 15 | #include <SoftwareSerial.h> SoftwareSerial HC05(2,3);void setup(){Serial.begin(9600);Serial.println("Enter AT commands:");HC05.begin(38400);}void loop(){ if (HC05.available()) Serial.write(HC05.read()); if (Serial.available()) HC05.write(Serial.read());} |
Comments
Post a Comment